Outdated instructions
April 2019: NOTE this web page written in 2015 is outdated, as it shows testing the Upload Server with Bonjour. Please see the updated Upload Server instructions for Activator Plug-in 5.
With the functions of Troi Activator Plug-in 3.0 and later your FileMaker Pro database can become an (Image) Upload Server. The Activator Plug-in can receive the uploaded (JPEG) images with user text and even (GPS) location information.
You can test the upload locally with the Safari browser.
Test locally with Safari
- If you have not done this, install Troi Activator Plug-in 5 first.
- Open the FileMaker example file UploadData.fmp12 (which can be found in the download).
- Start the Upload Server, by clicking on the button.
- Open the Safari browser, either on the same or a different computer on the network.
- Under the Bookmarks menu select: Show all bookmarks.
- Under Collections (on the left): click on the Bonjour icon
- You should now see a line “Troi Activator Upload Server on ” in the list of Bonjour services:
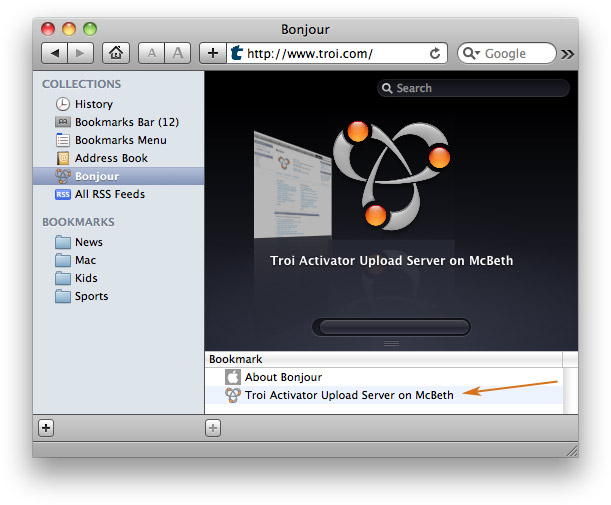
click the image to enlarge
- Double click the “Troi Activator Upload Server line to load the Upload page:
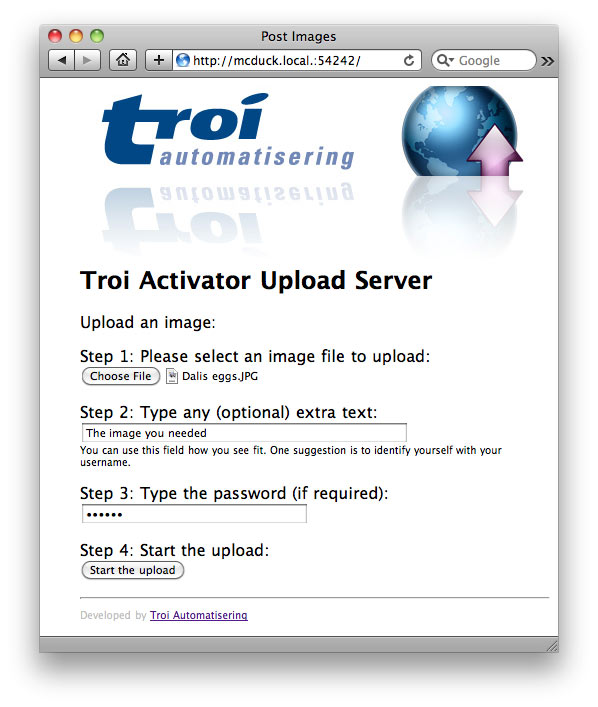
click the image to enlarge
- Select an image by clicking on the “Choose file” button.
- Enter some text and the password (if you specified a password when you started the Upload Server).
- Click the “Start the Upload” button.
- The image is now uploaded to the Activator Plug-in, which triggers a script called “HTTP_Request_TriggerScript”.
- The script creates a new record and puts the image in a container field.
Note that in this testing no GPS location data is sent.
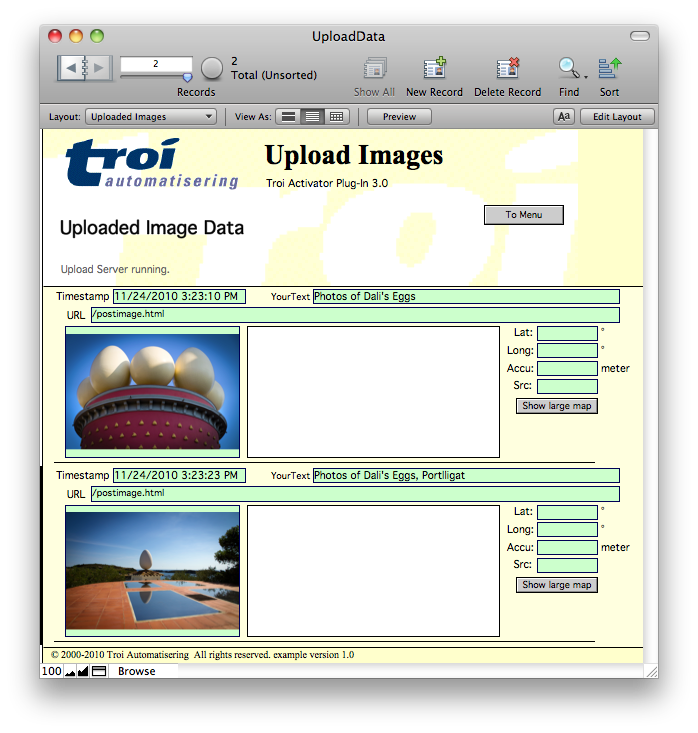
click the image to enlarge
- You can also just send text to the Upload Server. Click the ‘send text only’ link on the Upload page to see an example of this. You can use this to post a web request to activate a script.
Format of data sent to Upload Server
The Upload Server of Troi Activator can handle data from any source if the received format is as expected. It listens only to HTTP requests that use the POST method. Other requests are ignored (except requests to display an index.html page).
It conforms to RFC1341, in that it will be able to receive the data as multi-part form data. This is the same as how most web forms work.
The multi-part form data should be sent to http://<ip-address>:54242/postimage.html and should contain the following fields:
| Name | Content-Type | Sample data | Remarks |
| fileContents | image/jpeg | binary JPEG data | **optional |
| password | text | “secret” | *optional |
| locationData | text | “lat=23.01323&lon=4.784247 &accuracy=47&src=camera” | *optional |
| yourText | text | “bathroom of house, 42nd Street” | *optional |
| uploadButton | fixed text | “Upload File” | is ignored |
** Starting with Troi Activator Plug-in 3.5 sending the image is optional too, allowing you to send text only in the yourText input field.
Location data format
The location data should be formatted as follows:
"lat=12.34567&lon=12.34567&accuracy=47&src=camera"
where lat indicates the latitude, lon the longitude, accuracy (optional) the accuracy in meters of the location. src is optional and indicates if the image was just taken with the camera or came from the photo library, which means the location data is not of the photo, but from the current position of the iOS device.