To help users trust new software and more specifically plug-ins for FileMaker we sign our plug-ins. In this post we will describe how a plug-in maker can sign a plug-in on macOS and on Windows.
page last updated on January 30, 2019
What is code signing?
To be sure a piece of software is valid, unchanged and made by a certain developer, software should be code signed. The process of code signing adds a signature and a timestamp to the plug-in, and information about the developer and the issuer of the certificate used to sign the plug-in.
For our Troi Plug-ins we have been signing our plug-ins for a while, so you can check if a plug-in is made by Troi, and if it is unchanged.
For more information on how our code signatures look see the correct code signatures of Troi Plug-ins information.
Code signing on macOS with Xcode
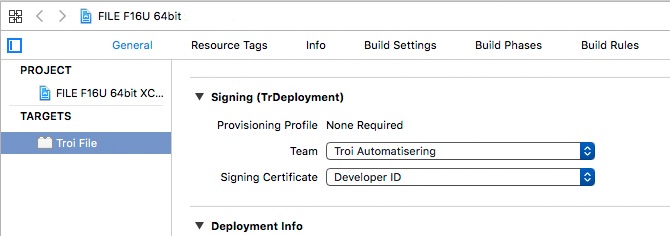
Code signing is built-in when you develop with Xcode. When you sign up as a developer, Apple will automatically issue you a developer certificate. Enable the signing in Xcode and you are all set up! In the General Build Settings you need to go to the Signing section and select your Developer ID certificate.
Code signing on Windows
On Windows code signing is a bit more work (Microsoft does not provide certificates).
Apply for a Code Signing Certificate
First you need to apply for a code certificate, with a trusted Certificate Authority (CA). We have initially used Comodo for this. After payment the CA will look if you are a respectable company. This can take a few days, including a telephone conversation with the CA. The process will also generate a private key on the computer you are using at the time, you will need this later.
Note It is not possible to use the certificate you get for macOS development by Apple on the Windows platform, as Apple’s Root Authority certificate is not installed on Windows. Even if you manually install this Apple Root Authority certificate it it will not work as Apple uses unknown extensions (to Windows) for its certificates.
Getting the certificate file
After you have been approved, you can download your certificate. Together with the private key generated earlier you can then export a combined certificate with private key in .p12 format. As we used a Mac for the process this meant opening the Keychain app and exporting the certificate from the keychain, with the option to add the private key selected. This results in a .p12 file, for example named: SignCertificate_WithPrivateKey.p12
Prepare the certificate
After you copy the file to Windows, you need to add a passphrase to the .p12 file and export it to a .pfx file (this might be done easier, but this is how we did it). You need a special command shell:
- Open Microsoft Visual Studio
- Select menu Tools and then Visual Studio Command Prompt
- In the shell type: certmgr and a return. This will open the Certificate Manager of Windows.
- Now import your .p12 file: click on the Import… button. NOTE be sure to check the option: Allow export of private key.
- Export your just imported certificate with private key as .pfx file and add a passphrase.
This results in a .pfx file, for example named: your-code-sign2018.pfx. We’ll call it the SignCertFile, which can be used for signing with signtool.exe.
NOTE pfx and p12 are the same binary format.
Signing your first plug-in
You need to use signtool.exe in the Visual Studio Command Prompt to sign (and also to verify) your plug-in. We will work on the Desktop:
- Put your SignCertFile your-code-sign2018.pfx and the plug-in to be signed (here Troi_File.fmx64) on the Desktop.
- In the “Visual Studio Command Prompt” shell type, on one line:
signtool sign /f "C:\Users\acme\your-code-sign2018.pfx" /p YOUR_PASSFRASE_HERE /tr http://timestamp.comodoca.com "C:\Users\acme\Desktop\Troi_File.fmx64"This command will add the signature to the plug-in and it is signed!
NOTE the switch /tr will add a timestamp to the signature, you need to access the internet server of your CA for this.
With the signtool command you can also verify the signature, like this:
signtool verify /pa "C:\Users\acme\Desktop\Troi_File.fmx64"Automate your signing
When you have your SignCertFile you can set it up to automatically sign each plug-in you build. You do this with a batch file.
- First create a batch file troisign.bat like this:
:: Troi code sign batch file
echo.
echo ---------------------------------------------------------------------------------
echo Code signing batch file (%0) executing.
echo ---------------------------------------------------------------------------------
echo.
echo Target: %1
:: *** set the path to the pfx file
set signCertFile="C:\......\Visual Studio 2013\Projects\Code Sign folder\your-code-sign2018.pfx"
echo Sign certificate: %signCertFile%
echo.
::
::
:: *** Start the signtool and sign the output file. ***
signtool sign /f %signCertFile% /p yourpassfrasehere /tr http://timestamp.comodoca.com %1
::
::
:: Also VERIFY the result:
signtool verify /pa  %1
::
:: NOTE You can also Verify VERBOSE: (not used here; it is commented out)
:: signtool verify /pa /v  %1
::
exit(0)- Put the batch file and your SignCertFile in the same folder for example the Code Sign folder in your Projects folder.
- Open Microsoft Visual Studio and your project.
- Open the Project Properties.
- in Build Events –> Post-Build Event –> Command Line add the following:
"..\..\..\Code Sign folder\troisign.bat" "$(TargetPath)"Your property window should look similar to this:

Now each time you build your plug-in it will be automatically signed!
More ways to verify
You can also use the Troi File Plug-in to verify the signature of a plug-in with the TrFile_GetCodeSignInfo function. See also checking code signatures of Troi Plug-ins for the names and information a user will see for Troi Plug-ins.
External links
- Wikipedia: Code Signing
- SignTool documentation on the Microsoft website.